Tuesday, 31 January 2012

Cannellini Beans with Cinnamon & Tomatoes


So the last week or so seems to have been filled with quite indulgent (though in some cases still relatively healthy) meals. I tend to vaguely plan a week ahead, a list of ten or so dishes from which I’ll choose from. And I tend to go in cycles. The current rota therefore seems to be much more veg, fish and pulse orientated and this recipe is the first of the current cycle.

Dried pulses do of course have the added ­benefit of being cheap and generally speaking have a slightly better flavour and texture than tinned. But saying that, they also require a lot more work what with all the pre-soaking and then boiling and whatnot. This though I wanted for a lunchtime meal and as it happens is a Nigel Slater recipe who says to use tinned, so good job all round. 

I have, when I am in my permanent abode, dozens and dozens of cook books as well as hundreds of pages of recipes clipped from magazines, free recipe cards and the like. In my temporary South East London kitchen I brought just the nine books with me, the rest being stored in a friend’s basement - this saddens me. But I do also have a virtual stack of bookmarked recipes and food blogs including tonnes of “clipped” Guardian website ones, where of course I came across a clipping (from two years ago) of a great selection of Nigel Slater pulses recipes (another of which to come soon) including the one here.

The aroma from the onions being slowly softened with the cinnamon (or in my case cassia, as my remaining cinnamon stick disintegrated into a million shards when I tried to break it in two) is absolutely heavenly and the final dish is warming, fragrant and satisfying. This would serve more as part of a mezze platter but I greedily wanted a bowl to myself with a warmed pitta, dollop of yoghurt and sprinkling of grated mature cheddar.


Cannellini beans with cinnamon and tomatoes
Serves 2


1 tbsp olive oil
1 onion, peeled, halved and very finely sliced
1 cinnamon stick, broken in two
1 bay leaf
2 cloves garlic, peeled and finely sliced
1 400g tin cannellini beans, drained and rinsed
weak chicken stock (about 200ml)
½ tsp chilli flakes
small (200g) tinned chopped tomatoes
¼ tsp sugar
40g black olives, stoned and roughly chopped
juice of ½ lemon
1 small handful parsley, tough stalks ­removed, coarsely chopped
1 small handful coriander, tough stalks removed, coarsely chopped
Salt and freshly ground black pepper
Yoghurt & grated cheese, to serve


Over a medium-low heat, warm the oil in a heavy-bottomed saucepan. Add the onions, cinnamon and bay leaf, and cook gently for 15 minutes, stirring frequently, until the onions are very soft. Add the garlic and fry for a couple of minutes more.

Add the beans and then just enough stock to barely cover the beans. Simmer for 10 ­minutes, then add the chilli flakes, tomatoes, sugar and olives, and continue to simmer uncovered for 15 ­minutes, stirring occasionally, until the tomatoes have thickened into a rich sauce.


Add the lemon juice then remove from the heat and leave to cool slightly before stirring in the parsley and coriander. Season to taste.

Serve with a little yoghurt dolloped over the top and perhaps a sprinkling of grated with warm pitta breads on the side.


Read More »

Sunday, 29 January 2012

Ayam Pongteh


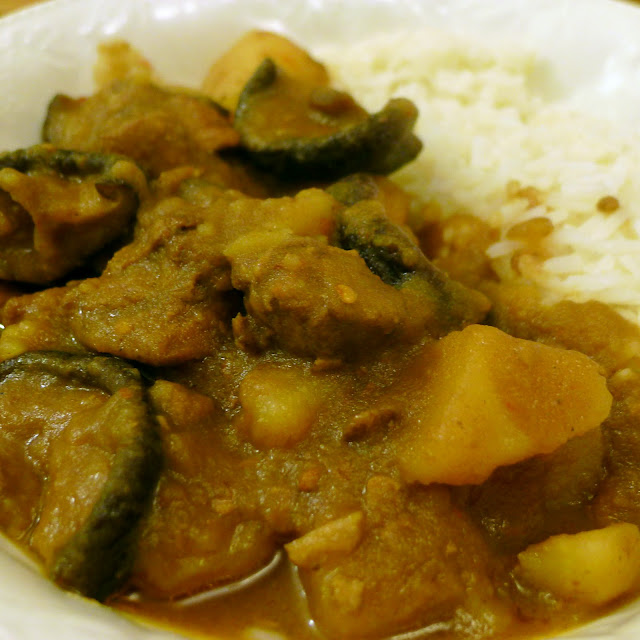
So, another Malaysian dish here and another nyonya one at that. Ayam pongteh is nyonya braised chicken with shiitake mushroom and potato and is popularly eaten at most festivals or celebrations in Malaysia (so I've read anyway). 

Although not spicy it is still very full flavoured with the sauce being enriched by lots of shallots, garlic and umami-rich fermented yellow beans. The chicken and potatoes become very tender and tasty from the savoury sweetness of the sauce

I actually cooked this on the eve of Chinese New Year which seemed quite apt really seeing as I'd read that it is traditionally served on festive occasions.

Serving sambal belacan, which is a thickish sauce made by pounding fresh chillies together with toasted shrimp paste and lime juice and sugar, as a condiment with this would give even more of a nyonya feel. In all honesty though I wasn’t in the mood to make some so opted for some sambal oelek on the side instead. This sambal is actually Indonesian in origin but I’m quite addicted to it’s sharp spiciness and thought it would probably work quite well.

I originally got the idea for cooking this from Sunflower’s blog and this recipe is adapted from there.


Ayam Pongteh - Chicken braised with potato and shiitake
Serves 2


250g chicken thigh fillets, cut into large pieces
2 tsp light soy sauce
pinch of ground white pepper
15g dried shiitake mushrooms, soaked in warm water (for about an hour)
40g shallot
2 cloves garlic
1 medium size potato, peeled and cut into chunks similar size to the chicken (keep in a bowl of water to prevent browning)
25g yellow bean sauce
1 tsp dark soy sauce
10g palm sugar
1 tbsp groundnut oil

Mix the chicken pieces with the light soy sauce and ground pepper and then leave to marinate for at least a few hours, although overnight in the fridge would be best.

Drain the mushrooms 
(but reserve the soaking water) and then slice them in half and set aside.

Blitz the shallots and garlic in a mini chopper or food processor until you have a smooth paste and mash the yellow beans with a pestle and mortar.

Heat the oil in a heavy bottomed pan or casserole over a medium heat and add the shallot and garlic paste. Cook for about ten minutes, stirring frequently until the paste is reduced and colouring.

Add the mashed yellow beans and cook, stirring, for a few more minutes before adding the chicken pieces. Cook for a couple of minutes stirring to thoroughly coat the chicken in the shallot and yellow bean mixture.

Add the dark soy sauce and then stir in the mushrooms before adding the mushroom soaking liquid to just cover the chicken and mushrooms (add more water is there isn’t enough soaking liquid).

Bring to the boil and then reduce the heat, cover and simmer for 20 minutes.

Add the potatoes, stir everything well to mix and then continue to simmer until the potatoes are cooked through and the chicken is very tender (keep an eye on the sauce and top up with a little more water if it is becoming too thick or dry).


Add the palm sugar and continue to cook for a minute before serving over rice with a spoon of your choice of sambal.


PS apologies for the terrible photos, the lighting in my current flat is dreadful and it seems really hard to get the balance right sometimes.


Read More »

Friday, 27 January 2012

Khmer Chicken Samla


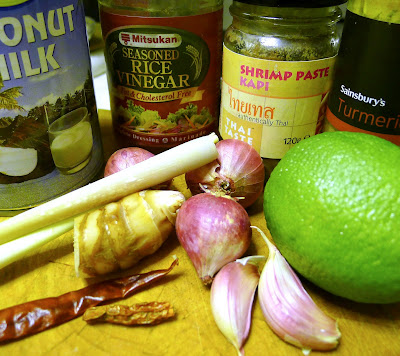
This dish, as its name suggests originates in Cambodia, where it is one of the most popular dishes apparently, and features in a book called Hot, Sour, Salty, Sweet (although I found the recipe online somewhere). It is basically an aromatic soupy curry made with a typically Cambodian lemongrass heavy paste and simmered in coconut milk. 

Another paste here then that involves a lot of chopping and pounding, but as usual I actually use my mini chopper and the whole process is becoming a lot less time-consuming. This is quite spicy but not too hot (you could of course increase the number of chillis should you so wish - I added the dried birdseye) intensely flavoured, yet rich and creamy. Despite the richness of the coconut milk, it is well balanced and truly delicious - it has become another of my new favourite curries!

Ideally a kaffir lime should be used in the paste and fresh turmeric. I’ve yet to source fresh kaffir limes though (without a huge delivery charge and as only a little ever seems to be used in recipes it hardly seems worth it) and so used a little normal lime. Similarly, turmeric powder seems to work fine.

A quick note about coconut milk - if you can get a tin of fairly decent stuff in an Oriental supermarket you’ll often find that when you open it, it is naturally split between think and thin, with the thick at the top and coating the lid. The important thing then is to not shake the tin before you open it. Then just spoon off the thick top milk, and scrape off the thick layer on the underside of the lid and keep that separate from the thinner milk below.

Serve with some plain white or jasmine rice to soak up the lovely sauce. I added a little sprinkle of crispy fried shallots which strictly speaking is more Thai than Cambodian but it provides a nice contrast to the creaminess of the sauce.


Khmer Chicken Samla
Serves 2


2 stalks lemongrass, root & top third and tough outer leaves discarded, finely sliced
small wedge of lime (inc peel), finely chopped to about ¼ tsp worth
⅛ tsp ground turmeric
pinch of salt
¾ tbsp finely chopped galangal
3 Asian shallots, coarsely chopped
2 medium cloves garlic, coarsely chopped (try and remove the central green sprout if there with a toothpick)
1 large dried red chilli, soaked in warm water (reserve) until softened, deseeded & deveined & chopped
1 dried red birdseye chilli, softened in warm water, chopped
½ tbsp shrimp paste
250 g boneless. skinless, chicken thighs, each cut into 3 pieces
½ tbsp vegetable oil
200 ml coconut milk (½ & ½ thick & thin if possible)
½ tbsp rice wine vinegar
½ tsp salt
¼ tsp palm sugar (can use normal sugar but palm is more complex in flavour)


Place the lemongrass in a mini chopper or food processor and blitz until very finely chopped. Add the lime, turmeric, a pinch of salt, and the galangal and blitz again until finely chopped. Add the shallots and garlic and another pinch of salt and process once more to a fine paste. Transfer to a bowl and set aside.

Either in the mini chopper or using a pestle and mortar, process the chilli to a coarse paste with a pinch of salt and if necessary a little of the chilli soaking water. Add this to the lemongrass paste and mix in well.

Meanwhile spread the shrimp paste on a doubled piece of aluminum foil, fold the foil over to seal, and flatten into a thin package. Place in a hot oven for 5-10 minutes until the paste is dryish and crumbly.

Thoroughly stir the toasted shrimp paste into the curry paste.

Remove any excess fat from the chicken and discard.

Heat a heavy-based pot over a medium-high heat and add the oil. When it is hot, stir in the curry paste and cook, stirring all the while until aromatic. Add the chicken pieces and stir to turn and coat.

Cook, stirring, for 7 to 10 minutes, until the chicken is starting to change colour.


Add half of the coconut milk (if you have been able to separate it into thin & thick, add the thinner half), rice wine vinegar, salt and sugar. Bring to a boil and then simmer for 10 minutes.

Add half of the remaining coconut milk, bring back to a boil then simmer, half covered, for 20 minutes before adding the remaining coconut milk. Simmer for a final 10 to 15 minutes, by which time the chicken should be very tender.

Serve with rice, spooning lots of sauce over the chicken and rice. Yum!


Read More »

Wednesday, 25 January 2012

Thit Kho Tau


This is a Vietnamese recipe which I first saw on the site Jessie and the Giant Plate and is basically pork braised in a caramel sauce with boiled eggs.

As in China (that has it’s own version of this), there are lots of pigs in Vietnam meaning that a lot of pork is eaten - and as pork has an affinity with sweetness the Vietnamese also utilize caramelised sauces.

Most recipes call for belly pork but in the interests of my expanding waistline and wanting to be a bit healthier I swapped it for some pork shoulder from the butcher, asking for it to still have some fat on it - which it did but nowhere near as much as belly.

The original recipe also used coconut milk and water but a few others I saw said to use coconut juice so that was what I hunted down: it was actually very hard to get hold of in the end (although saying that typically my local Tesco has just added it to it’s shelves!) before I had the brainwave of trying my local little South American shop (SE1 has a very large Latin American population) where I came up trumps.

As coconut juice or water is getting a bit of a reputation for being super healthy (apparently it is very high in antioxidants and contains more potassium than two bananas as well as being fat-free) I reckon it could probably also be found in health food stores.

I have also seen a version that uses 7Up but otherwise I’m sure a coconut milk and water combo or even just water would be fine

I used ready hardboiled quails eggs here but small normal eggs could be used instead, obviously just hard boil them yourself.

Other variations on the name that I’ve seen seem to be Thit Heo Kho Trung and Thit Heo Kho Voi Trung as well as just Khit Tho but Thit Kho Tau is the name used in the original recipe I saw so I’ll go with that.


Thit Kho Tau (Pork and Quail’s Eggs in a Caramel Sauce)
Serves 2


250g of belly pork
1 spring onion, finely chopped
1 clove of garlic, minced
1 tbsp of fish sauce
1½ tbsps of sugar
½ tbsp water
½ can of coconut juice
6 quail’s eggs
salt and white pepper


Cut the pork into ½ inch chunks, trying to make sure that each bit has a bit of fat on it. Put in a small bowl with the finely chopped spring onion, minced garlic, fish sauce and some salt & pepper. Mix well and set aside.

In a heavy-bottomed saucepan or casserole, heat the sugar and water until the sugar is caramelising.


Add the pork & its marinade and cook, stirring for a few minutes until the pork is changing colour.

Add the coconut juice and bring to the boil, then reduce the heat to a gentle simmer. Cook, partially covered for about 60 minutes, stirring occasionally, and topping up the liquid if it reduces too much.

Prick the quails eggs about 6 times all over with a toothpick (so they’ll absorb flavours from the lovely sauce), add them to the pot and cook for a further 30 mins.


Serve with plain white basmati or long grain rice. I also added some Sichuan pickled vegetable on the side to add some contrasting texture and to offset the richness of the dish.


Read More »

Monday, 23 January 2012

Prawn Curry


I like prawns, and as you may have noticed, I love curry. And so over time I’ve worked on what I now think is pretty close to being the perfect prawn curry (although this is also brilliant but as it’s not my creation...).

You can of course use ready ground spices if you like but it really is worth the effort in toasting & grinding your own as it definitely will affect the flavour for the better.

Cardamom has a uniquely strong spicy sweet taste and an intensely aromatic, almost resinous fragrance. I chose to also use black cardamom here as I like the distinctly smokey aroma and flavour it adds. Black cardamoms are larger than the usual green and wrinkled.

Using low fat yoghurt makes this pretty healthy as well, though you can substitute with full fat if you prefer, or even coconut milk, though I think yoghurt is better here. The great thing about using prawns too is that once the prep is out of the way (and it’s not that much effort to do a bit of chopping and grinding) this is really quick to cook making it pretty much perfect for a weekday evening.

And of course it is very, very tasty.


Prawn Curry
Serves 2


1 tbsp groundnut oil
1 medium onion, chopped
2 large cloves of garlic, chopped
1 inch ginger, peeled and chopped
2 chillies (red or green - up to you)
½ cinnamon stick
3 green cardamon pods
1 black cardamom pod
1 teaspoon cumin seeds
¼ teaspoon coriander seeds
½ teaspoon turmeric
½ teaspoon cayenne pepper
6 black peppercorns
small tin chopped tomatoes
½ tsp sugar
5 curry leaves
3 tbsp natural low fat yoghurt
250g raw prawns
3 tbsp fresh coriander, chopped
¼ tsp garam masala
lemon


Dry fry the whole spices (not the turmeric or cayenne) in a small frying pan over a medium high heat until fragrant. Set the cardamom pods and cinnamon stick to one side and then grind the rest of the spices using a pestle and mortar.


Put the onion, garlic, ginger and chillies in a spice grinder and and blend to a paste.

Put 1 tbsp of oil in a pan over a medium-high heat and add the onion paste, cooking for a few minutes until any liquid has evaporated off and it is starting to colour. Add the spice mix and whole spices and continue to fry, stirring all the time for a minute or so.

Add the chopped tomatoes, curry leaves and sugar and keep stirring and cooking until you have a fairly thick, reddish brown paste.

Take off the heat and stir in the yoghurt, gradually so that it all mixes in well without the yoghurt splitting.

Add about 125ml water and return to the heat. Bring to the boil then simmer quite hard for about 5 mins until the sauce has thickened.

Add the prawns and cook until they turn pink - which will only only take a few minutes. Be careful not to overcook them or they will be tough and rubbery.

Stir in the garam masala and chopped coriander with a good squeeze of lemon juice. Taste to check the seasoning and adjust carefully if necessary.

Serve with basmati rice.


Read More »

Spinach & Walnut Stuffed Mushrooms


This is another simple supper dish where again you can pretty much play around with the ingredients depending on what you’ve got hanging around in the fridge - using different veg, nuts and different cheeses to ring the changes. I was tempted in fact to fry up some chopped pancetta and add that to the stuffing mix but decided to have a meat free day instead.

I’ve used fresh baby spinach leaves here but you could use frozen spinach instead if that is what you have. If you do, use about 150g and cook it gently over a low heat in a pan with a lid until it is defrosted. You’ll probably also need to drain off any excess liquid before mixing it in with the mushrooms and garlic.

Serve with a nicely dressed green salad - I topped mine with halved baby plum tomatoes and some chopped pickled long green chilli.


Spinach & Walnut Stuffed Mushrooms
Serves 2


4 large flat portabello mushrooms
200g baby spinach leaves, chopped
1 tsp olive oil
2 cloves garlic, finely chopped
25g walnut pieces, chopped
¼ tsp dried chilli flakes or red pepper powder
4 tbsp thick soured cream
¼ tsp freshly grated nutmeg
1 tbsp panko or white breadcrumbs
3 tbsp grated Mature Cheddar


Preheat the oven to 200ºC.

Remove the stalks from the mushrooms, and chop them finely.

Heat the oil in a non-stick frying pan and add the chopped mushroom stalks and garlic. Cook for a minute or so until they begin to soften and turn golden then add the spinach and dried chilli flakes and sauté until the spinach has nicely wilted - a few more minutes.

Stir in the walnuts and soured cream & 2 tablespoons of the cheese. Season and add the nutmeg.

Place the mushroom caps stalk-side-up in a lightly oiled baking tin then spoon the filling into them.

Mix together the breadcrumbs & remaining cheese, scatter over the mushrooms then drizzle with a little oil.


Bake for 12–15 minutes until cooked through and browned on top.

Serve with a mixed leaf and tomato salad.


Read More »

Sunday, 22 January 2012

Nyonya style laksa


There are many, many different types of laksa in Malaysian cuisine. To be honest I find it all pretty confusing. As far as I can make out, the laksa most frequently available in the UK is curry laksa (also known as curry mee) but the other main variant is asam laksa (also known as Penang laksa) - not named for anything to do with tea but rather asam is the Malay word for tamarind which is used to give the soup base it’s sour flavour. Other varieties include Sarawak lakas, Joohor laksa and Ipoh laksa.

And one of the further variant’s of curry laksa is laksa lemak, also known as nyonya laksa.

The Nyonya cuisine of the Peranakans (descendants of the early Chinese migrants who settled in Penang) is the unique result of blending Chinese ingredients and wok cooking techniques with spices used by the Malay/Indonesian community, the result being tangy, aromatic, spicy and herbal. The word nyonya itself is an old Malay word that is a term of respect and affection for women of prominent social standing (part “madame” and part “auntie”).

Nyonya laksa seems to be kind of a combination of curry laksa and asam laksa, as it combines both coconut milk and tamarind.

I came upon this recipe on the now defunct Almost Bourdain website while looking for different things to do with all the yellow bean sauce I seem to have amassed.

The spice paste, or rempah, is made of chilli, garlic, Asian shallots and toasted shrimp paste (belachan) and it is cooked in both coconut milk and cream as well as the tamarind and yellow bean paste. The overall combination gives you spicy, sour, salty and creamy.

Here I have used cellophane noodles but you can use thick or thin rice noodles instead as per your preference. The vegetables used are also up to you - I have used garlic chives as I’d recently been to Chinatown, beansprouts and red pepper. But other garnishes may include cucumber, onion and coriander.

Candlenuts by the way are often used in Malaysian and Indonesian cooking for both flavour and as a thickening agent. They can however be difficult to get hold of so macadamia nuts, which are similarly high in oil content as well as texture when pounded, make a decent substitute.


Nyonya Style Laksa
Serves 4


10 Asian shallots, peeled & chopped
3 red chillies, chopped
5 dried red chillies, soaked & chopped
1 head of garlic, cloves peeled & chopped
1 tbsp shrimp paste, roasted in a hot oven until dryish and crumbly
2 tsp turmeric powder
1 inch piece fresh galangal, chopped
4 macadamias (or candlenuts if you can get hold of them), chopped
1 stalk lemongrass (top third and tough outer leaves discarded), chopped


1 tbsp groundnut oil
160 ml coconut cream
400 ml coconut milk
250ml chicken stock
3 tbsp yellow beans sauce
3 tbsp tamarind paste (ready to use wet tamarind)
200 g dried rice noodle
1 bunch garlic chives, chopped into 2 in lengths
250 g bean sprouts
1 red pepper, finely julienned
20 raw prawns
Sambal oelek & coriander to serve


In a mini chopper or food processor, grind the shallots, red chilies, garlic, shrimp paste, turmeric, galangal, nuts and lemongrass to a fine paste and set aside.

Also purée the yellow beans by pounding using a pestle and mortar.


Heat the oil in a large pan over a high heat and add the paste - cook, stirring, for about 5 minutes or until the paste is darkening and becoming explosively fragrant.

Turn the heat down, add the coconut cream and simmer for about 10 mins. Then, stir in the coconut milk and the stock & simmer for a further 30 mins.

Add the yellow bean puree and tamarind & simmer while you prepare the vegetable and noodles. The sauce should taste hot, a little sour, sweet and salty.

Blanch the rice noodles in boiling water until they are just soft. Drain and set aside. Blanch the garlic chives, bean sprouts, and red pepper in separate batches in the boiling water until they are just soft. Combine the vegetables and rice noodles in a bowl.

Bring the sauce to a boil and add the prawns until they are pink and cooked through.

Ladle the sauce and prawns into bowls and serve with the noodle and vegetable salad.


Read More »

Tuesday, 17 January 2012

Jungle Curry with Duck


The first time I made this was when my friend Laura came down to London and stayed at mine - Laura loves spicy Thai food but isn’t keen on coconut so I decided my mission was to peruse David Thompson’s Thai Food to find something suitably delicious.

Jungle curries originate from the north of Thailand where they differ from the “norm” in that they never contain coconut milk. Thailand, despite being quite small, has quite distinct and diverse cooking styles and cuisines in the four main regions. In the Northern regions, because at certain times of the year it can be quite cold, the coconut tree doesn’t grow well and so coconut cream and milk isn’t used much and as I say, never in a jungle curry.

Furiously hot, the jungle curry has very complex flavours because of the use of green peppercorns, krachai, galangal and so on. It is very hot for 2 main reasons - firstly it has a lot of chillies in it but also the heat of the chillies isn’t actually being tempered by soothing coconut milk as happens with green and red curries.

This curry is brilliant and definitely my favourite of the Thai curries but it does take a long time to prep as there is a huge amount of chopping, julienning, pounding etc. I use my grinder to make the pastes as although I’m well aware that purists believe that pounding with a pestle & mortar produces the best paste it takes me about an hour (if I’m lucky) to prep as it is - frankly I am coveting one of these or these.

This curry also makes use of two pastes - a curry paste as well as garlic and chilli. I’ve no idea in all honesty how the taste of the final curry would be affected if just one paste was made by incorporating both but David Thompson clearly knows what he is doing so who am I to argue.

You fry the garlic paste and then the curry paste until it becomes explosively aromatic - you can’t miss this stage as once you hit it you’ll start sneezing like a lunatic. I also fry my duck, skin side down until the skin crisps up (reserving the resultant & copious fat for roasting) before slicing but you can get the rid of the skin if feeling rather more health conscious.

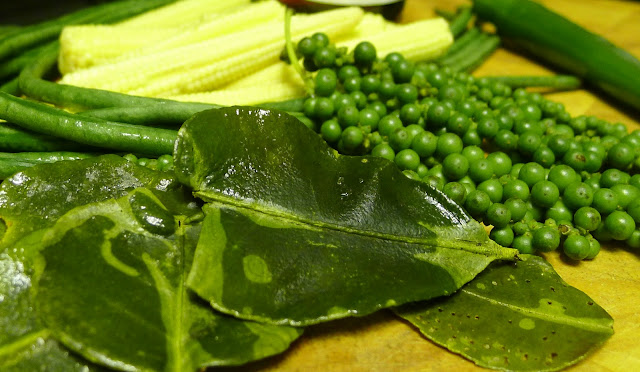
A note on some of the ingredients, most of which can easily be found in Asian grocers or supermarkets... green peppercorns are the fresh berries from the pepper plant, harvested when they are immature. They have a fresher, more herbal flavor and are less pungent than black or white pepper. I have only ever used fresh peppercorns, keeping them attached to the sprig or vine rather than stripping them off, as I go to Chinatown specifically for them if I’m going to make this. I have now acquired a jar of pickled green peppercorn sprigs, so I’ll be interested to see what they’re like some other time.

Snake beans are also called yardlong or Chinese long beans because, well, they are long! Green beans would make a perfectly acceptable substitute though.

Krachai (or grachai) or wild ginger as David Thompson dubs it is a relative of ginger and has a distinctive earthy & peppery flavour though milder than both ginger and galangal. The tubers look like a bunch of wizened, skinny, yellow-brown fingers and it is also sometimes called fingerroot or Chinese keys. Galangal is another member of the ginger family with a subtle citrus yet peppery flavour.

On this occasion I couldn’t find apple aubergines so left them out and added extra snake beans and baby corn instead. A bit of a shame as I do think the apple aubergines add something to the curry. I also omit pea aubergines as of those, I’m not a fan - no matter how hard I try to like them in Thai food they just taste like little balls of nasty bitterness to me.

Finally I couldn’t get my hands on any holy basil anywhere in Chinatown which is really frustrating (I scour the shops there on a regular basis every few months or so hoping that this will be the time I hit the jackpot). Thai Taste do (or at least did) little glass jars of the stuff but I can’t find it stocked anywhere anymore. Actually, I have noticed that Amazon sell it but only in quantities of six which is annoying. Anyway I used a bit of normal basil instead which will probably get me barred from ever returning to Thailand but I thought it was worth a go. Similarly, I can’t find kaffir limes so instead used normal lime zest and coriander stalks instead of root. Luckily I do have a quantity of frozen lime leaves in the freezer (also of curry leaves and lemongrass) though!

The recipe below is ultimately an amalgamation of a couple of different jungle curry recipes of David Thompson’s with my own omissions as above, and a bit of tinkering generally - dedicated to my lovely friend Laura.


Jungle Curry of Duck
Serves 4


320g duck, skinned if preferred, sliced into pieces 1 inch long and ¼ inch thick
2 tbsp vegetable oil
4 tbsp fish sauce
500ml weak chicken stock
100g snake beans cut into 1in lengths
8 baby corn, cut into small pieces at an angle
10 stalks krachai, scraped &julienned
1½ long green chilies, thinly sliced at an angle
6 kaffir lime leaves, torn
handful of holy basil leaves (or small handful of normal basil), torn
5 sprigs of fresh green peppercorns
For the curry paste
10 dried red chillies, soaked, deseeded & deveined, and chopped
3-4 dried small red chillies, soaked and chopped
2 bird's eye chillies, chopped
½ long green chilli, deseeded and chopped
good pinch of salt (if you use a pestle & mortar as it will help to make a paste)
3 tbsp chopped galangal
1 tbsp chopped ginger
2 stalks lemongrass, top third and tough outer leaves discarded, chopped
20g krachai, chopped
2 tsp chopped coriander root (if you can get it, otherwise stalks)
2 tsp lime zest
50g red shallots, chopped
50g garlic cloves, chopped
1½ tsp Thai shrimp paste


For the garlic and chilli paste
3 garlic cloves, peeled
pinch of salt (if you use a pestle & mortar)
3 stalks krachai
3-5 bird's eye chillies

Make the two separate pastes by either grinding the ingredients together in a food processor or mini chopper or use a pestle and mortar.

Heat the oil over a high heat in a wok or heavy saucepan and, when very hot, add the garlic and chilli paste. Fry until golden and starting to catch. Quickly add 4 tbsp of the curry paste and continue to fry, stirring constantly, until explosively fragrant.

Stir in the fish sauce, then add the stock and bring to the boil.

Add the duck and all the vegetables and simmer for 5-10 minutes or so until the duck is cooked and the vegetables are tender but retaining bite.


Add the remaining ingredients. Simmer for a few more minutes. Check the seasoning - it should be sharp, hot, salty and pungent - then serve with rice.


Read More »

Sunday, 15 January 2012

Fried Gnocchi with Pancetta, Spinach, Cherry Tomatoes and Mozzarella


As I’ve mentioned elsewhere I’m not actually a fan of shop-bought gnocchi, I find them too dense and claggy.. frying them though does somehow seem to magically transform the clagginess into something toothsome and more-ish.

I originally stumbled across this recipe on Liberty London Girl’s blog. The first time I made it was for a Saturday lunch, suffering from a bit of a hangover (after a delicious meal and Aperol Spritzs at the newly opened Antico and then a drink or three at Village East) and it was indeed, as she’d suggested herself, perfect hangover fare.

I was in need of a tasty but quick dinner this week so decided to cook it again, this time pimping it up a bit with the addition of some diced pancetta and baby spinach. It was, if I may be so bold, even more delicious (not to mention even more calorific).


Fried Gnocchi with Pancetta, Spinach, Mozzarella and Cherry Tomatoes
Serves 1


50g pancetta
200g shop-bought, ready-made gnocchi
cherry tomatoes (about 12)
½ ball mozzarella, torn into small pieces
small handful basil leaves, torn
couple small handfuls baby spinach leaves, finely chopped
butter
olive oil
1 tbsp double cream
¼ tsp dijon mustard
sea salt & freshly ground black pepper


Boil a large pan of salted water, add the gnocchi and cook according to packet instructions (2-3 minutes usually).

Meanwhile in a largeish non-stick frying pan sauté the pancetta with a little olive oil and a small knob of butter over a medium heat.

When the gnocchi is done, drain well and tip into the frying pan with the pancetta - be careful it will probably sputter a bit.

After a minute or so add the halved tomatoes and continue to fry until the gnocchi have started to brown and crisp up a little then throw in the mozzarella, spinach and basil.


Give it an initial stir but the try not to stir too much or the cheese will clump together. Keep frying, giving the occasional shake until the gnocchi are looking nice and crispy then stir in a tablespoon or so of cream, the mustard, a little sea salt and a good grind of black pepper.

Cook for another couple of minutes then serve and greedily scoff.


Read More »

Friday, 13 January 2012

Eggs en Cocotte with Spinach & Garlic Toast


The classic French name for this is oeufs en cocotte, basically describing eggs cooked and served in a small singular dish, in other words a ramekin. Simply put, a baked egg.

One of the great things about it (apart from being simple to make, and delicious of course) is it’s versatility. Not only can it be served as an easy breakfast or brunch, but also as a light, but quite decadent supper. And the possibilities are endless. The recipe below is quite simple, but you can easily use other ingredients such as chopped and butter sauteéd leeks, smoked haddock or salmon, wild mushrooms or truffles. I’ve even seen a version with foie gras.

A bain--marie is basically a water bath: all you need to do is place the ramekin, once you’ve filled it, in a roasting or baking tin, then pour enough boiling water into the tin to come halfway up the sides of the dishes before popping it, carefully, into the oven.

I made this as a snack while I was simmering the preceeding soup. I’m nothing if not greedy.


Eggs en cocotte with spinach and garlic toast
Serves 1


small handful of baby spinach leaves
small knob of butter
drop of garlic olive oil
fresh nutmeg
salt & pepper
large egg
4 tsp double cream
1 tbsp parmesan, freshly grated
thick slice of sourdough bread
small clove of garlic, sliced in half

Preheat the oven to 180C and butter an ovenproof ramekin.

Sauté the spinach in a small pan with a little butter, a drop of garlic oil, seasoning and a grind of fresh nutmeg.

Arrange the cooked spinach in the bottom of the ramekin, top with the egg, season, and then spoon over the cream. Top with a little freshly grated parmesan.


Bake in the oven, in a bain marie, for about 10-15 minutes until the white is just set but the yolk is still runny.

Toast a slice of sourdough and then rub it with the pieces of garlic, cut-side down. You can then butter the toast lightly if you like (I do).

Serve the egg with the toast immediately.


Read More »

Thursday, 12 January 2012

Spicy Butternut Squash Soup with Cream & Roasted Seeds


I had a squash in the fridge leftover from roasting another earlier in the week and I decided I fancied a nice warming soup for the weekend.

I like making soup, it's generally pretty easy and something that once you’ve done the chopping you can just leave to simmer until blitzing with a stick blender (or not of course if you prefer a bit of chunk). This is one in my repertoire that I’ve not done for a while either so it deserved a bit of an outing.

The other good thing with soup is that you can make a huge batch of it to take to work for lunch during the week, so it’s economical too. Which in January, that seemingly endless month, is definitely a good thing.


Spicy Butternut Squash Soup
Serves 4


2 tbsp olive oil
2 sprigs of rosemary
3 bay leaves
4 garlic cloves, crushed
1 medium red chilli, chopped
1 medium butternut squash, peeled, deseeded and cubed (reserve the seeds)
2 carrots, peeled and chopped
1 large potato, peeled and cubed
2 celery sticks, chopped
1 medium onion, chopped
½ tsp cumin seeds
½ tsp chilli powder
¼ tsp smoked paprika
1 litre of veg or chicken stock (I actually used half and half)
2 tbsp double cream plus a little extra for drizzling


Heat the oil over a medium heat in a large saucepan and add the garlic, chilli, paprika, bay, rosemary and cumin seeds. Gently fry for a minute.

Add all the vegetables and sauté for a few minutes, constantly turning until everything is mixed well and the veg is coated in the spices.

Add the stock and turn down the heat to low. Cover and simmer for about 45 mins.

Allow the soup to cool a little. While waiting, clean the seeds of any squash pulp & fibre.

Put the seeds on a baking tray with a drizzle of olive oil and a little salt. Shake around so all covered and then put in a hot oven for 10-15 minutes until a light toasted colour.

Discard the bay leaves and rosemary then blend the soup with a stick blender until smooth. Pour in the cream and blend again.

Reheat if necessary then serve, drizzled with a little extra cream and scattered with roasted squash seeds.


Read More »

Monday, 9 January 2012

Slow Braised Beef Shin with Ginger & Soy


Another recipe taken from River Cottage Every Day. I've actually made a heavily tampered with version of this before, for friends, but decided this time I would stay true to the original recipe.

Shin is a fantastic cut in my opinion. It is cheap, due to the fact that it is also the driest, toughest cut of beef but it is perfectly suited to long and slow braising in liquid where it becomes deliciously flavoursome and meltingly tender. It is the sinewy bits in the cut that melt into the sauce adding extra flavour and richness while also accounting for the full-bodied almost gelatinous texture of the meat so don't be tempted to trim them off.


Shin of Beef with Ginger & Soy
Serves 2

1 tbsp groundnut oil
600 - 750g beef shin, cut into 2cm thick slices
3 large garlic cloves, thinly sliced
thumb sized lump of ginger, thinly sliced
1.5 tbsp tart fruit jam or jelly - I used Swedish cloudberry jam but redcurrant would work well
75ml soy sauce
200ml apple juice
1 tbsp cider vinegar
1 long red chilli
sea salt & freshly ground black pepper

Preheat the oven to 140C.

Season the chunks of meat with salt and pepper and heat the oil in a heavy bottomed casserole. Brown the pieces of meat, in batches, on all sides, setting each batch to one side as you go.

Reduce the heat to low and add the garlic and ginger slices, cooking gently until they are softened but not coloured.

Add in the jam and soy sauce, mixing together then add the meat on top. Try as far as possible to keep the meat in a single layer then pour in enough apple juice to barely cover the meat.

Finally add the vinegar, whole chilli and some freshly ground black pepper before covering and putting  in the oven for at least 3 hours until the meat is completely tender.

Serve with some noodles and greens sautéed with a touch of garlic and sesame oil.


The ginger and garlic slices should be eaten with the meat - as for the chilli, discard or eat depending on your preference and how brave you are feeling!
Read More »

Sunday, 8 January 2012

Roasted Butternut Squash with Rosemary, Garlic & Chilli and Spring Greens Rice


Squash is delicious roasted - I have used butternut squash here but other Autumn squashes would work just as well with onion squash being the next natural choice for me I think.

Roasting brings out the nuttiness of squash while fresh herbs, garlic and chilli set off the natural sweetness of it. Don't be tempted to peel the squash though, the skin is edible and will become deliciously caramelised and chewy.

The following is taken in the main from a side vegetable dish recipe in Hugh Fearnley-Whittingstall's River Cottage Every Day. Here though I have made it as a main with some basmati rice with sautéed spring greens stirred through.


Roast Squash with Rosemary, Garlic, Chilli & Pinenuts
Serves 2

½ large butternut squash, deseeded
4 large garlic cloves, skin on but slightly squished using the heel of your hand
couple sprigs of roasermary
1 red chilli, finely chopped
2 tbsps olive oil
20g pinenuts
squeeze of lemon
150g basmati rice
2 good handfuls spring greens, roughly chopped
garlic oil
sea salt and freshly ground black pepper

Preheat the oven to 190C.

Cut the squash half into quarters and then into wedges and throw into a roasting tin. Add the garlic, rosemary and chilli then season generously.

Trickle over the olive oil, toss it all together well then pop into the oven for between 45 mins and 1 hour, stirring halfway through.

Meanwhile, toast the pinenuts over a medium heat in a dry frying pan until golden brown (be careful not to burn them, it can happen very quickly!).

Also, cook the rice and sauté the chopped greens in a splash of garlic oil until wilted. Stir the greens through the cooked rice.

By now the squash should be soft and getting caramelised at the edges. Scatter the toasted pinenuts over with a good squeeze of lemon and toss it all together. Serve atop a mound of rice and greens.

Read More »

Tuesday, 3 January 2012

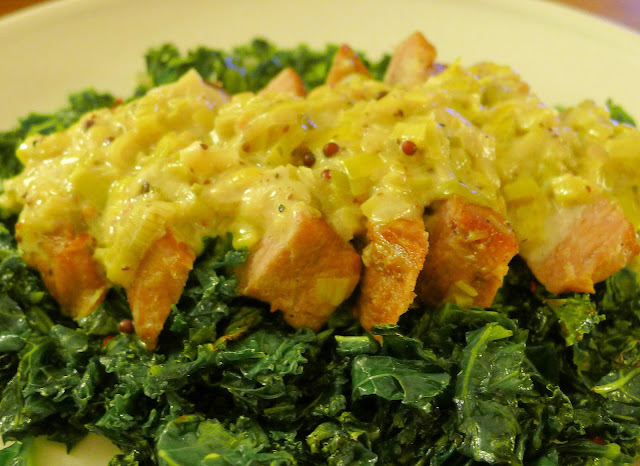
Pork Steaks braised with Creamy Leeks & Mustard


So as evidenced by my last two 2011 update posts, I’ve finally settle into the new (old) flat, or at least as well as I ever will so thought it time to get back in the blogging saddle. Of course it is now, albeit temporarily, my rather small, South East London kitchen but there we go.

Feeling relatively uninspired by some leeks in the fridge I opted in the end for a braised pork recipe - very similar in fact to the braised veal chops I’ve cooked previously but with cabbage instead of leeks.

My intention with this had been to use a mixture of dijon and wholegrain mustards. As I was fresh out of the latter I opted to use black and yellow mustard seeds mixed with the dijon instead. Feel free to use wholegrain mustard if that is what you have. I also had some celery seeds in the cupboard so decided to use them but they’re purely optional.

One thing that I have noticed is that the photos I take in this flat are truly awful: the lighting I guess. For the time being I'm not at all sure what I need to do about it so do bear with me!


Pork braised with creamy leek & mustard sauce
Serves 2


2 pork shoulder steaks
2 large leeks, washed, trimmed and thinly sliced
butter
2 cloves garlic, finely chopped
2 tbsp crème fraîche

½ small glass vermouth
250ml chicken stock
1 tbsp olive oil
½ tsp black mustard seeds
½ tsp yellow mustard seeds
½ tsp celery seeds (optional)
2 tsp dijon mustard
sea salt and pepper


Preheat the oven to 180C.

Season the pork steaks on both side with sea salt & freshly ground black pepper then brown the steaks on both sides in a little olive oil in a casserole over a low heat on the hob. Set aside.

Add a small knob of butter to the casserole then add the leeks and garlic, mustard seeds & celery seeds. Cook over a low heat for 5 minutes until the leeks are beginning to soften.

Turn up the heat, add the vermouth and reduce by half before adding the chicken stock. Bring to boil then simmer for a few minutes.

Nestle the steaks into the sauce, half cover and place the casserole in the oven. Cook for 1 hour.

Remove from the oven and set the pork steaks aside somewhere warm. Put the casserole over a medium heat on the hob and stir in the crème fraîche and Dijon mustard. Simmer for a couple of minutes. Check the seasoning and adjust carefully if necessary.

Serve either whole or sliced, with a veg of your choice (I went with a bed of sautéd, shredded kale) and the sauce poured over.


Read More »