Thursday 26 December 2013

Pork Vindaloo


This is inspired by a number recipes - one from Das Sreedharan in “Curry”, a Camellia Panjabi recipe from “50 Great Curries of India”, (which oddly is actually a recipe for lamb rather than pork despite the fact that she states herself that Vindaloo is traditionally made with pork) and one online by Anand Solomon, a chef from the state of Karnataka which is next to Goa.

I wasn’t going to include potatoes as I was under the impression they were inauthentic and, much like super-fireyness, invented by UK curry houses. But Solomon includes them and if its good enough for an Indian chef who is renowned for some of his Goan recipes, it is good enough for me.

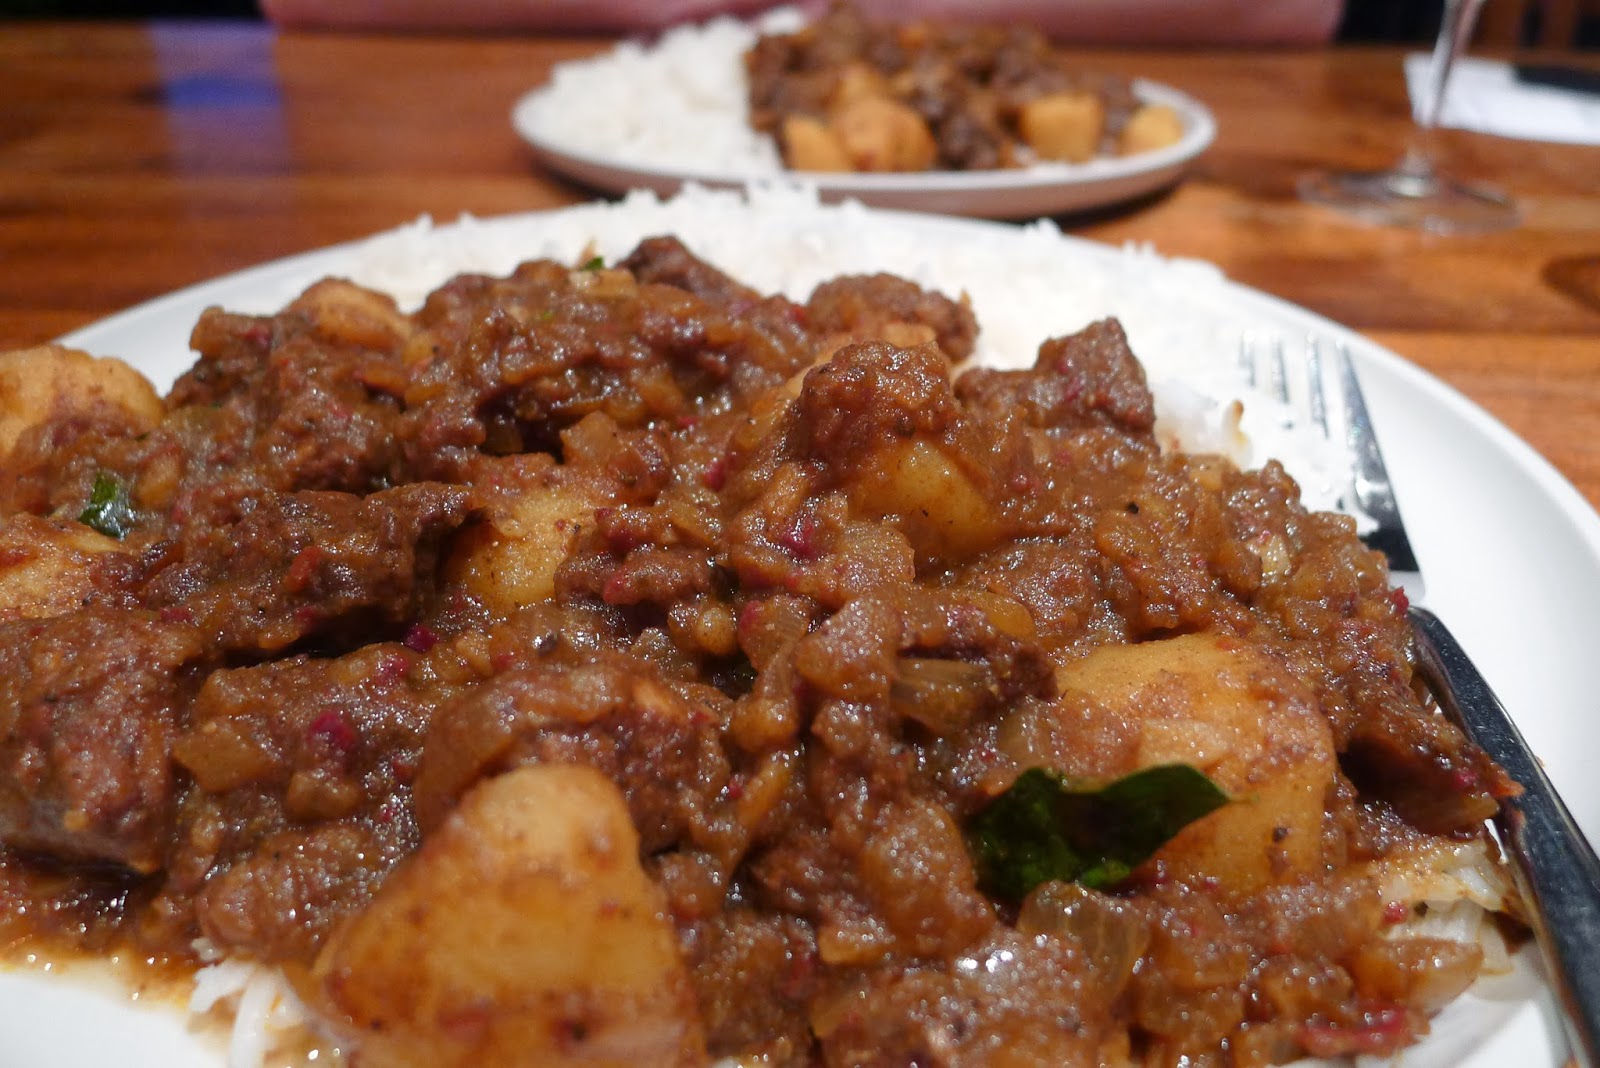
I’ve used Kashmiri chillies here and deseeded ones at that, and while still quite hot, they’re not blow your brains out hot. You’ll notice that the photo shows only a couple of small onions whereas I state 1 ½ medium ones, but just so you know, there were more propping up the jaggery. Do use pork with a decent amount of fat if you can, such as shoulder.

I have previously briefly discussed Vindaloo’s Portugese origins here but as a reminder “aloo” doesn’t come as is often thought from the Hindi word आलू meaning potato but rather alho which is Portugese for garlic.

I wanted traditional, which despite what the average UK curry house would have you believe, does not mean that your head detaches from your body in some sort of “Scanners” type explosion, and I think this is fairly close to it (despite the inclusion of the potatoes), or as close to traditional as any of my bastardised recipes are. I hope so anyway. Ultimately what you are looking for is spicy, but not excessively hot, and a bit “sweet sour”.


Pork Vindaloo
Serves 2-3


for the spice paste
8-10 dried Kashmiri chillies, soaked in water for 30 mins to soften, then deseeded and chopped
½ tsp cumin seeds
2 cardamom pods, seeds only
3 cloves
1 inch piece of cinnamon stick
¼ star anise
1x⅛ inch piece of ginger, chopped
3 garlic cloves, chopped
1 tsp tamarind concentrate (or 1 ½ tsp tamarind paste)
3 tbsps cider (or white wine) vinegar


for the curry
2 tbsp rapeseed or groundnut oil
1½ medium onions, finely chopped
2 garlic cloves, finely chopped
2 tsp tomato pureé
½ tsp turmeric powder
400g pork, cubed
sea salt & freshly ground black pepper
¼ tsp jaggery (or palm sugar, or failing that normal sugar)
2 medium potatoes, par boiled and cut into 3cm cubes
8-10 curry leaves
¾ tsp garam masala


For the spice paste firstly grind all the dry ingredients until a fine powder in a spice or coffee grinder, or food processor. Add the “wet” ingredients (including the softened chillis). Then whizz all together until you have a fairly smooth paste.

Mix the cubed pork with a little of the paste in a medium sized bowl - just enough that the cubes of pork are coated - then cover and set aside in a cool place for 30-60 minutes.


Heat the oil in a pan and cook the onions over a medium heat for 15 minutes until browned. Add the garlic and cook for 5 minutes more.


Mix in the spice paste & tomato pureé and fry for 5 minutes more, adding a little water as necessary (I reserve the water from soaking the chillies for this purpose).


Tip in the pork and the turmeric and sauté for 10 minutes, stirring occasionally.

Season well with salt & pepper then add the jaggery and 300ml of water.


Bring to the boil then simmer for 20 minutes.

Add the potatoes (and probably a bit more water) and continue to cook for another 20 minutes until the pork is tender and cooked through and the sauce has thickened. Stir occasionally to ensure it doesn’t catch.


Stir in the curry leaves & garam masala, cook for a further 5 minutes and serve with basmati rice.


Read More »

Tuesday 24 December 2013

Taco Pasta


I had an evening alone which meant, as ever, that I had an excuse to have an experimental cook and / or cook something really dirty. This comes under both headings really.

Having seen a couple of pasta dishes on Pinterest referring to “Taco”, my interest was piqued (Meaty! Tomatoey! Cheesy! Creamy!) but in all honesty I couldn't be sure if the bf would feel the same way. I was also of the opinion that somethings that sounds so good in theory could be well be a victim of the sum of its parts and be absolutely revolting.

In the end I adapted this from The Girl who ate everything and I’m happy to report that it was not revolting but in fact pretty damn good: luckily as I’d made enough for leftover lunch the next day. 


I went with large shells here but I think this would be just as good (if not better, considering that large shells have an annoying tendency of sticking together) with small ones.


Taco Pasta
serves 2

250g turkey mince
175g pasta shells
1 small banana shallot, finely chopped
1 clove garlic, minced
1 tin chopped tomatoes
2 tbsp jalapenos, drained & chopped
2-3 tbsp taco seasoning
3 tbsp quark (or low fat cream cheese)
3 tbspl sour cream
2 tbsp chopped coriander
Salt and pepper


Bring a large pot of water to boil. Cook pasta according to the package directions, but about 5 mins or so less (so just before perfectly al dente). Drain, reserving some of the cooking water and set aside.

Meanwhile, cook the shallot over a fairly low heat in a large sauté pan with a little olive oil until softened and translucent. Add the garlic and cook for a minute or so more.

Push the shallots and garlic to the outside of the pan and add the mince. Cook over a medium heat until no longer pink and starting to brown.

Add in the jalapenos, chopped tomatoes and taco seasoning.


Let simmer over a medium heat for about 10 minutes.


Stir in the cooked pasta, quark (or cream cheese), sour cream and reserved pasta water, and continue stirring until the cream cheese is melted and the sauce is well blended.


Season with a little salt if necessary and plenty of black pepper and continue to gently simmer for a further 3-5 minutes.

Stir through the chopped coriander.


Serve immediately in large, warmed bowls.


Read More »

Sunday 8 December 2013

Devil's Curry


God only knows how I came across this one: I suspect I just stumbled upon it, perhaps on Rasa Malaysia’s excellent site but really I don’t know.

As is probably fairly obvious Devil’s Curry (also known as Curry Debal) is very spicy. It seems that it descends from the from the Eurasian communities of Malacca (Malaysia) and Singapore: probably Portuguese. Certainly it has, to my mind at least, similarities with that other Portuguese Eurasian dish Vindaloo. Often made at Christmas or other special occasions it is, as I say, a fiery dish enriched with candlenuts (or Macadamia's if you can't get them) and galangal (or ginger if galangal is not available) and then sharpened with vinegar.

As with many curries, stews and casseroles the flavours develop and become richer the next day. And perhaps this was my problem, I was so looking forward to this but ultimately I was underwhelmed: the combined flavours here should lead to something complex and tantalizing to the taste buds but I was just a little disappointed (my other dining companions weren’t, apparently, so it may have just been me). I will try it again though and next time I will leave it a day and see how I find it the next. I suggest you do the same.


Devil’s Curry
Serves 2


1 ½ tbsp groundnut oil
½ tbsp mustard seeds
500g chicken thigh fillets, cut into pieces
250g potatoes, peeled and cut into pieces
100ml water
salt and palm sugar to taste
¾ tbsps tamarind concentrate dissolved in 100ml water
1 tbsp white vinegar
For the Spice Paste
10-15 dried chilies, deseeded and soaked in water for 20-30 minutes
1 large banana shallot, coarsely chopped
3 cloves garlic, coarsely chopped
1 stalk lemongrass (white part only), thinly sliced
0.5 x 1.5 inch piece ginger, minced
⅛ tsp ground turmeric
2 tbsp groundnut oil
1 tbsp water
4 candlenuts, chopped
½ tsp shrimp paste


In a spice grinder whizz up all the ingredients for the spice paste until smooth (you may have to do this in 2 batches). Set aside.


In a large heavy-based sauté pan heat up the oil and when it is hot, add the mustard seeds. Cook until they start to pop then add the spice paste into the oil and fry until aromatic - about 10-15 minutes.


Add the chicken and stir around to coat with the spice paste. Let it cook for about 8-10 minutes and then add the potatoes, stirring to combine.


Pour in the water to barely cover the meat and potatoes.

Stir well and then bring to a boil before reducing back down to a simmer: cover with a lid and leave for 20-30 minutes or until until the potatoes are soft and the chicken cooked through.


Adjust the seasoning with a little salt and palm sugar as necessary and then add the tamarind juice and white vinegar. Stir to mix then serve immediately with plain basmati rice and sprinkle with chopped coriander.


Read More »

Thursday 5 December 2013

Spanish Spaghetti


I’ve seen a version of “Spanish” spaghetti in a few places on the internet and apparently all of those were originally adapted from Cooking Light (which I’m guessing is a cooking mag in the vein of Olive or similar). 

I’ve now adapted it further, mine is made with pork mince (because pork is more Spanish, right?!) instead of the original beef and I've also added chorizo and charred red pepper. I’d wanted to add some chopped Guindilla chillies but I forgot. Typical.

It’s really very nice and completely open to further fiddling: adding or subtracting ingredients and flavours (while trying to keep to the Spanish theme) as you see fit.


Spanish Spaghetti
serves 2


150g wholewheat spaghetti
½ tbsp olive oil
1 anchovy, chopped
1 large banana shallot, finely chopped
2 garlic cloves, crushed
½ teaspoon dried oregano
¼ teaspoon celery seeds
1/4 teaspoon crushed red pepper flakes
1 red pepper, chargilled and chopped
freshly ground black pepper
1/4 teaspoon saffron threads, crushed
200g minced pork
1 raw chorizo sausages, skinned & finely chopped
¾ jar tomato pasta sauce (about 300g)
60g pimiento-stuffed olives, sliced
2 tbsp dry sherry
½ tablespoon capers
2 tbsp fresh parsley, chopped


Heat the oil in a large sauté pan over low-medium heat and fry off the anchovy until it has dissolved into the oil.

Add the chorizo and onion to the pan and sauté for 8 minutes or so until the onion is softened and translucent and the chorizo is coloured.

Add the garlic and cook for a minute or so more.

Stir in the oregano, celery salt, chargrilled red pepper and flakes, saffron and a hefty grinding of black pepper.


Push the onion, chorizo, pepper and herb mix to the sides of the pan and turn up the heat a little.
Crumble the pork into the pan and cook for 5 minutes or until it is browning, stirring as you go and breaking up the pork further with the back of a wooden spoon.


Turn the heat up a little more and pour in the sherry. Let that bubble up then add the pasta sauce, turning the heat back down

Stir through the olives, capers and 1 tablespoon of parsley.


Bring to the boil briefly then simmer for 15 minutes.

Meanwhile cook the spaghetti according to the packet instructions but a couple of minutes less. Drain, reserving a couple of tablespoons of cooking water and add that, along with the spaghetti itself to the sauce.

Stir well and let it cook for another couple of minutes.


Divide between two plates and serve sprinkled with the remaining parsley and freshly grated parmesan.


Read More »

Sunday 1 December 2013

Burmese Golden Egg Curry


I first decided to make this on seeing a picture of Bill Granger’s recipe on the Independent website. I bloody love egg curry anyway and thought the picture showed a particularly lovely way of presenting eggs. They’re first boiled, then peeled and fried in turmeric-tinged oil until golden and blistered before being cut in half and added to a lightly spicy tomato-based sauce which is soaked up slightly by the textured exterior of the eggs rather than just sliding off as it would with plain boiled eggs.

I’m rarely one to just go with an online recipe as seen: I like to see who else has cooked it and take bits from all, wrapped up in my own spin. The weird thing with this is that there are many, many “Burmese Golden Egg Curry” recipes out there (including one from the ‘ever popular with the Ozzies’ (she’s Canadian, unlike Bill who actually is Australian) Naomi Duiguid) but I haven’t seen any article on Burmese food & its popular dishes, list it. Strange non? Still, all the same, I presume it is actually authentically Burmese.

The eagle-eyed among you will notice that while this recipe, and its ingredients are for two, the pics clearly only show ingredients for one: well, that’s because it started off as a recipe for two but remembering that the bf isn’t that keen on boiled eggs (weirdo) I cooked it just for myself while he was away on a camping trip with his boy.

Incidentally, while researching this recipe I came across this article warning people about “fake eggs” flooding Myanmar, which is just about one of the weirdest things I’ve ever read.


Burmese “Golden” Egg Curry
serves 2


2 duck eggs
3 tbsp rapeseed oil
1 large banana shallot, finely chopped
½ tsp turmeric
2 tsp red kashmiri chilli powder
2 garlic cloves, minced
5-10 small dried shrimp (depending on size, enough to make ½ tsp), ground
4 tomatoes, finely chopped
1 tbsp fish sauce
1 poblano chilli, sliced into strips lengthways (I used strips from a can as I had some to use up)
small handful coriander
crispy fried shallots (see recipe here or buy ready made)


Add the eggs carefully, one by one (as quickly as possible though) to a pan of rapidly boiling water and cook for 8 minutes.

Drain the eggs then let sit under cold running water for a few minutes. When they are cool enough to handle peel them.

Heat the oil in a wide heavy-bottom sauté pan a medium-high heat. Stir in the turmeric and when it has dissolved into the oil and is fragrant carefully add the peeled eggs and fry for 3 to 4 minutes, turning until golden and blistering on all sides.


Remove from the pan with a slotted spoon and set aside.

Pour off all but 1 or so tablespoons of the oil and over a medium heat, add the shallots - fry until soft and caramelised, about 8 minutes, before adding the garlic. Cook for a little longer and then add the chilli powder and cooking for a few minutes more.


Add the tomatoes and 50ml of water and simmer for 10 minutes or so, stirring occasionally until the tomatoes have broken down.

Stir in the fish sauce, chilli strips and dried ground shrimp then taste and adjust carefully for seasoning if required.

Turn the heat up, give everything a good stir then cut the eggs in half and place them cut side down in the sauce. Cook for a further 3 or 4 minutes.


Serve with plain rice and scatter with coriander & the crispy shallots.


Read More »

Saturday 30 November 2013

Pork & Ginger Gyoza with Dipping Sauce


Gyoza actually originated in China, but as with many other things it's gotten assimilated into everyday Japanese cooking. Closely related to shumai and wonton, the filling is usually pork- based, with cabbage, spring onion, garlic or garlic chives, and ginger although there are many variations.

You really need to have as thin a gyoza skin as possible - and of course you can always make your own but even in Japan thin, ready-made gyoza skins are usually used. I think my dumpling skins, bought in Chinatown were for wonton and I’m honestly not sure if it would have made a difference: I think my technique was more of an issue really!

The usual method for cooking gyoza is to “steam-fry” them so that they are crispy on the bottom and smooth and slippery on the top. It can be tricky to get it right to be honest - when you add the water you need to be sure not to add too much: obviously it is easy to add extra if needed but if you add too much at the outset you’re a bit stuffed really.

Gyoza are a traditional accompaniment to ramen in Japan, so I cooked these when I made ramen number 2 of the preceding post. The recipe came from a recent issue of Olive magazine but since making this I did of course go to Tokyo and gyoza were one of the things we made at the cooking class that I attended. That recipe will follow soon - and thankfully my technique improved a fair bit.

One final point to make: the Olive recipe didn’t specify light or dark soy sauce (and I’m used to the distinction with most regional Chinese recipes I follow) so I used dark but, as this was clearly an error, do use light soy if you can.

Oh, and by the way, a good tip is that you can freeze any extra gyoza that you don't think you'll eat in the first sitting (so to speak). The best way to do this is to put them on a metal baking tray in a single layer and pop the tray in the freezer. Once the gyoza are frozen you can then put them back in the freezer in a freezer bag or plastic container and TA-DAA - they won't get stuck together, and you can take out as many as you want, when you want.


Pork & Ginger Gyoza
makes about 20

100g spring greens, shredded, blanched for 2 minutes then drained & cooled
2cm ginger, grated
1 clove garlic, crushed
200g minced pork
1 tbsp soy sauce
1 egg white, lightly beaten
2 spring onions, finely chopped
20 gyoza / dumpling wrappers
1 tbsp sunflower oil
For the Dipping Sauce
3 tbsp light soy sauce
1 tbsp rice vinegar
1 tsp caster sugar
1 tsp sesame oil
1/2 red chili, finely chopped


Squeeze out any excess water from the greens then finely chop. Put in a bowl with the ginger, garlic, pork, spring onions, soy and 1 tbsp egg white.


Season then mix well and set aside to marinate for about an hour if possible.


Make your dumpling assembly station ready: you'll need a little bowl of water, a baking tray lined with parchment, the dumpling wrappers, the filling and a teaspoon. Keep the dumpling skins under a damp cloth or in the plastic pack they come in to keep them from drying out.

Put a skin / wrapper on your palm and using the tip of your finger moisten the edges with water. Put a teaspoonful of filling in the middle - try not to overfill them or you'll have trouble closing them up.


Bring the 2 sides together to make a crescent shape and pinch firmly in the middle. Fold over the skin on the side facing you, from both sides to make pleats, pinching firmly as you go. Place on the baking tray so that the top edges are straight up and push down slightly to flatten the bottom. Repeat with the other dumpling wrappers until you are out of filling.


When ready to serve, heat a little vegetable oil in a large non-stick frying pan that has a lid. Put in the gyoza flat side down and cook over a medium to high heat for a couple of minutes until the bottoms have started to crisp up and are golden. Lower the heat.


Add 125ml of water to the pan, immediately popping the lid on.


Steam for 5-10 minutes or until the wrappers are tender and look sort of transparent


When the water is almost all gone, take off the lid and turn the heat up to high to evaporate the rest. Place on a serving plate and repeat with any remaining gyoza.

Mix the dipping sauce ingredients together in a small, shallow dipping bowl and serve.


Read More »

Sunday 17 November 2013

Ramenarama


Prior to going to Tokyo, and probably as I had been planning the Tokyo trip I had a massive yearning for ramen one weekend. The bf was away, oop north camping with the midget, so I trudged into Chinatown (well slipped and slid, it was peeing down, I’d forgotten an umbrella and was wearing new ballerina’s.. West End pavements seem to resemble ice rinks in the wet: it was a bloody nightmare) to scour the shops for ingredients.

It wasn’t entirely successful to be fair, as there were a few things I just couldn’t find. And in the end after finding an interesting looking instant ramen noodles packet in the Japan Centre I decided that I would have two attempts: one made with said instant noodles, with toppings of my choice.. and one made with a bit more effort (although admittedly not much more) and using fresh ramen noodles.

In the case of the latter it would of course have been much better to make my own ramen broth but at this point I was soaked, had nearly slipped over at least a dozen times and was miserable - and I had found some ramen seasoning cubes in the Japan Centre so thought I’d give them a go.

Not exactly making from scratch then but still more so than the ramen noodle soup packet I was also to try out.

I also wanted to get chashu (char siu pork) but couldn’t find any anywhere and really just didn’t have the time to make that from scratch. So what I have instead is some pork loin slices, from the deli section in Tesco and just to up the pigginess some very finely sliced pork belly, also found in the Japan Centre. It’s actually intended for Shabu Shabu, hence the thinness of the slices but what the hell, I thought I’d give it a go.


Ramen #1
serves 1


Interestingly these weren’t particularly cheesy but rather gave a rich umami-ness that was kind of reminiscent of tonkotsu ramen. It really worked pretty well and I’d definitely get these in again as a store cupboard standby for a quick ramen fix.

pack of instant “cheese” ramen noodles
2 cooked pork loin slices
seasoned bamboo shoots
1 spring onion, finely chopped
1 medium-boiled duck egg
light soy sauce
nanami togarashi


Basically cook the noodles according to the package instructions: or if you are me study the Japanese instructions and ingredient packets until you can just about figure out the instructions.


I knew the noodles were cooked in 550ml for 4 minutes and that two of the 3 sachets went in with the noodles and the third on serving.. it took some doing: my knowledge of Kanji isn’t brilliant (ahem - I know about 3 characters and that is only since returning from Tokyo) but I got there in the end.

The sachets are:

Ramen seasoning -


Toppings (a bit stingy but I did like the bits of “fishcake”):


And cheese flavouring:


I think it was the cheese that was added last, I can’t recall.

Anyway, once the noodles are cooked, tip the lot into a bowl, and top in as an artistic fashion as possible the chopped spring onion, pork slices, halved egg and menma. Dash a little soy onto the eggs and sprinkle a little togarashi over the lot.

Slurp away!


Ramen #2
serves 2


Because I was ostensibly making a little more effort here I also went a bit more for it in terms of the toppings, as you can see

100g fresh ramen noodles
1 litre ramen stock (made up from ramen seasoning sachets, I used 3)
½ pkt dashi seasoning (about 2.5g)
2 medium-boiled duck eggs, halved
6 cooked pork loin slices, halved
4 slices thinly sliced pork belly (or unsmoked streaky bacon), lightly cooked
½ small can sweetcorn, drained
2 spring onions, finely chopped
Some nori (cut into strips)
3 tbsp seasoned bamboo shoots (menma)
chilli oil
light soy sauce to taste (optional: I sprinkle it over my egg yolks)
nanami togarashi (optional)


Place 2 bowls in a low oven or in hot water to warm them and make sure to have your toppings prepared and at hand, ready to serve. 

Make the ramen stock according to instructions, adding the dashi seasoning (for a little extra oomph). Allow this to gently simmer while you cook your noodles according to how you like them. 

In Japan there are varying degrees of “hardness” of noodle (also dependent on the type of ramen you get): yawame, bari, bari bari (very hard), mecha bari (super hard), and kona otoshi (noodles are plunged into boiling water just long enough to remove the flour). I tend to go for bari.

When the noodles are ready, drain them and divide them between the two bowls: add the stock into the bowl and then arrange your toppings on top, circular fashion around the bowl with the spring onions in the middle, topped with the chilli oil.

Serve with a little soy sprinkled over the eggs and togarashi over everything.

I also made some gyoza to go with the ramen: the recipe of which you can find on the next post.

In all honesty, both versions were terrific: the first was super quick and essentially surprisingly tasty considering that it was effectively glorified super-noodles but naturally the second version pipped it, so really the extra effort really did make all the difference.


Read More »